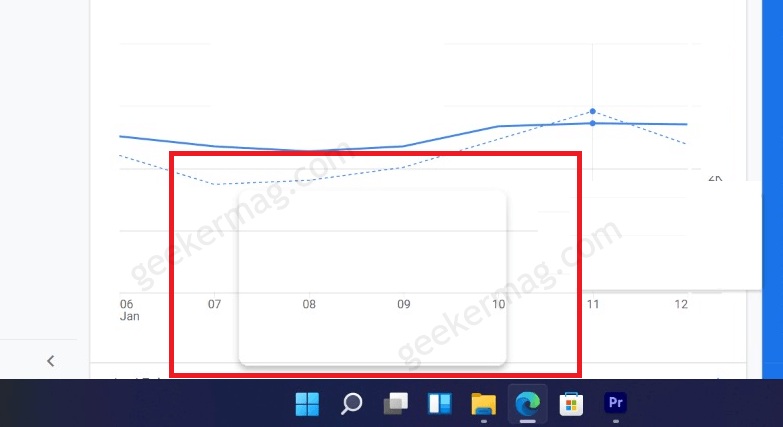
According to various reports, Transparent floating box start appearing above the taskbar from no where in Windows 11. Usually, it appear when opening Start menu and clicking search icon available on the taskbar. Sometimes it appear automatically without doing anything. While other users reporting that they see Floating transparent box over the taskbar with loading cursor. The annoying thing about this rectangular floating box is that within the box range nothing works; no clicks and scrolling. Even if you’re using text editor like Word or Notepad, then you won’t be able to place cursor and type. Usually, that box is expected to appear when you hover over search icon, it show last last three searches that you have made using Windows 11 search feature. Check following screenshot to know clear idea: Its really an annoying issue of Windows 11 and exist in build for Windows 11 in Stable channel, and Beta or Dev channel. Also, there’s no information if Windows Developers are aware of this issue or not.
Fix – Transparent Floating Box above Taskbar in Windows 11
If you made upto this blog post, then it is high possible that you’re also seeing transparent rectangular box above taskbar, right? As of now, there are some temporary solution that you can try to fix the issue:
Click Search icon
The box is associated to search feature of Windows 11. So click on the Search icon available on the Taskbar to open Search menu. It is highly possible that this will hide transparent box. Although, success rate are less with this solution.
Restart File Explorer
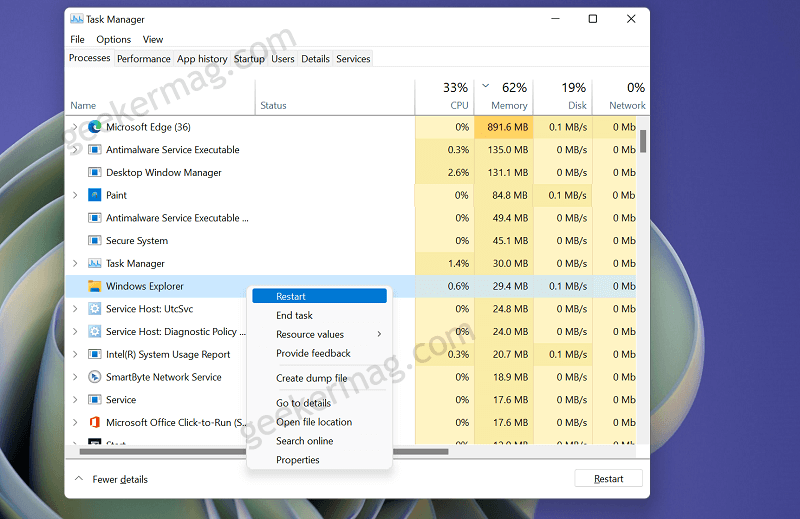
According to various reports and I’ve tested this personally, restarting File Explorer in Windows 11 fixes the issue for almost all the affected users. For that, launch Task Manager in Windows 11 and then locate File Explorer from the list. Right-click and select Restart. Everything will be gone from desktop for a second and reappear again. And it is highly possible that, Rectangular Transparent box will disappear as well.
Disable Windows MiniSearchHost
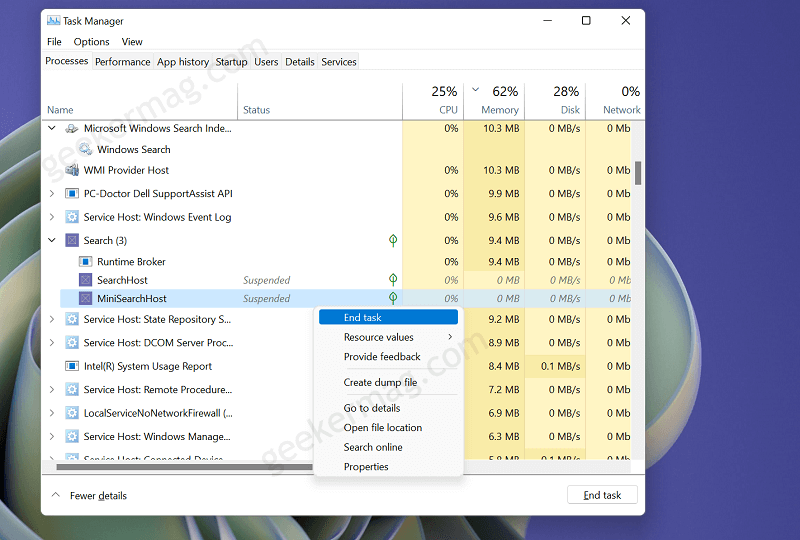
Some users reports that disabling Windows MiniSearchHost process in Windows 11 also fixes the issue. Here’s how you can do that: Launch Task Manager in Windows 11 by pressing CTRL + SHIFT + ESC. Under Processes tab, locate Search and expand to see more options. Here, you will find MiniSearchHost, right-click and select End Task. And this should fix the issue.
Disable Transparency Effect
Some users also suggesting that disabling Transparency effect in Windows 11 fix the issue. Here’s how you can do that: Launch Settings app in Windows 11 by pressing WIN + I key combo Next, switch to Personalization tab on the left side and then on the right side, locate and turn off Transparency effect. Transparency effect play and important role in maintaining the look of Windows 11 UI. So disabling this might fix the issue, but this also effect look of UI.
Restart your computer
If all the solutions mentioned above fails to fix the issue, then restart your computer and this will 100% fix the issue.
Disable Show Recent Searches when Hover on Search icon
If nothing works, then last solution is to disable Show Recent Searches when Hover on Search icon in Windows 11. FYI, When you hover the cursor over the Search icon, it shows search suggestions based on what you have search recently. The purpose of including this feature is to help users so that they don’t have to search for the same thing again and again. As of now, the option to show or hide Recent Search item box is only available in Windows 11 Insider Builds. So, if you’re running any insider build, then check out this post: How to Disable Show Recent Searches when Hover on Search icon in Windows 11 The action will turn of Recent search feature in Windows 11 and fix the Transparent Floating Box above Taskbar in Windows 11 as well. Note – All the solution I have covered above are temporary solution. As per various reports, the bug reappear after sometime. So it is highly recommended to launch Feedback Hub application on your Windows 11 PC and report the issue. In case, you know any solution that helps in permanently fixing the issue, then feel free to share with us in the comments that will be helpful for other Windows 11 readers.


